
Musculoskeletal MRI Made Simple: A Beginner’s Course for Vet Techs

Dr. Jaime Sage, a leader in veterinary MRI, shares insights to help new vet techs master musculoskeletal MRI.
If you’re a new vet tech interested in musculoskeletal MRI (MSK MRI), you’re stepping into an exciting and essential area of veterinary imaging. Mastering MRI sequences, patient positioning, and minimizing common MRI artifacts is key to producing high-quality images. These skills help veterinarians make confident, well-informed diagnoses.
But where do you start?
Welcome to ‘The Definitive Guide to Musculoskeletal MRI’!
That’s why we created this blog series. In Part 2, we’re breaking down the fundamentals of MRI patient preparation for vet techs, helping you confidently assist veterinarians in diagnosing joint pain, soft tissue injuries, and other joint conditions that otherwise go unseen with X-rays.
This blog series is inspired by Dr. Jaime Sage, founder of Sage Veterinary Imaging (SVI) and a leader in veterinary radiology techniques. Dr. Sage’s published article in Veterinary Clinics of North America: Small Animal Practice offers expert insights into how MRI works for animals, and we’re here to break it down into simple, practical steps.
What You’ll Learn in Part 2:
The best MRI sequences for diagnosing soft tissue injuries in pets.
A step-by-step guide to MRI patient positioning for vet techs.
Understanding MRI artifacts and how to minimize them.
Grab your notepad, and let’s get started!
Why Musculoskeletal MRI Matters in Veterinary Medicine
Think of MRI as a high-powered detective uncovering the hidden clues behind a pet’s pain or lameness. When X-rays fall short, Musculoskeletal (MSK) MRI steps in to reveal what’s really happening–whether it’s a tiny ligament tear, an early-stage bone lesion, or soft tissue damage.
As a vet tech, you’re a key player in this process. Your role isn’t just pressing buttons–it’s about delivering crisp, reliable MRI results, keeping pets comfortable, and giving vets the best possible data for the right diagnosis. And the better you understand MSK MRI, the more valuable you become to your veterinary imaging team.
4 Key MRI Sequences Every Vet Tech Should Know
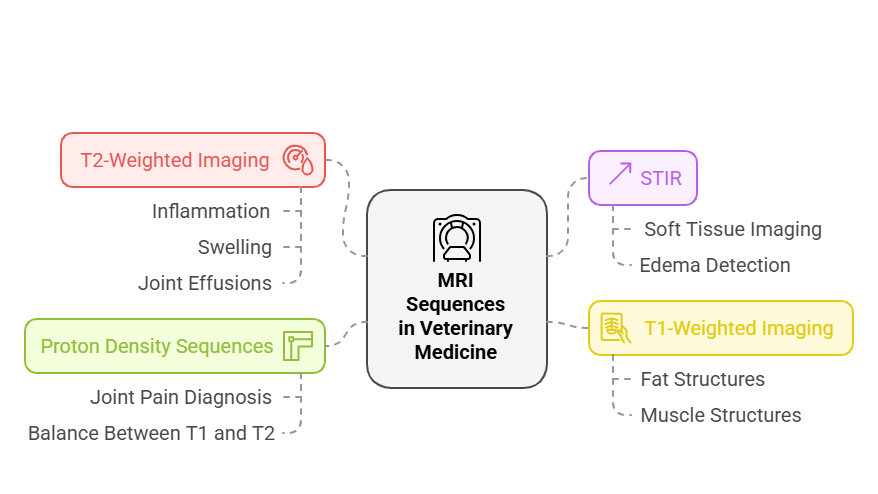
A quick reference guide to key MRI sequences every vet tech should know for musculoskeletal imaging.
You don’t have to be a board-certified radiologist to understand MRI sequences, but knowing the basics will help. Here are the key MRI sequences you should focus on:
1. T2-Weighted Imaging: The "Fluid Finder"
Highlights fluid buildup, swelling, and inflammation.
Helps detect joint effusions, tendon injuries, and spinal cord abnormalities.
Think of it as the go-to tool for spotting hidden injuries in soft tissues.
2. STIR (Short Tau Inversion Recovery): The "Edema Expert"
Suppresses fat signals, making swelling and bruising stand out clearly.
Ideal for spotting bone marrow issues, fluid buildup, and early ligament damage.
3. T1-Weighted Imaging: The "Anatomy Map"
Best for showing detailed anatomical structures like muscle and fat.
Helps differentiate normal tissues from abnormal ones for a definitive diagnosis.
4. Proton Density (PD) Sequences: The "Balance Keeper"
Offers a mix of T1 and T2 properties, making it great for joint imaging.
Useful for identifying cartilage damage, meniscus injuries, and subtle changes in soft tissues.
By recognizing these key sequences, you can help make sure the right settings are used for each case, leading to more accurate results.
3 Expert Tips for Patient Positioning for Optimal MRI Imaging

SVI employees demonstrate proper MRI patient positioning to help vet techs capture high-quality scans.
Proper MRI positioning for animals is one of the most important parts of your role as a vet tech. Getting it wrong can lead to blurry or misleading scans, making a diagnosis harder.
Here’s what to keep in mind when positioning a patient for an MRI:
1. Keep the Patient Still
MRI requires absolute stillness to capture clear, artifact-free images. Since pets can’t remain perfectly still for the duration of the scan, general anesthesia is required to keep them safe, calm, and motionless throughout the procedure.
2. Use Positioning Aids
Foam pads, sandbags, and supports help keep the patient aligned correctly. This ensures symmetry in the scan, making it easier to compare left and right limbs.
3. Double-Check Limb Alignment
If a joint or limb is misaligned, the MRI might suggest a problem that isn’t actually there. Always check that the body is in a neutral, natural position before scanning.
Understanding MRI Artifacts and How to Minimize Them
Artifacts, which are unwanted distortions in MRI images, make scans harder to interpret.
Here are some of the most common ones and how to avoid them:
Motion Artifacts: Blurred Images
Caused by patient movement during the scan.
Prevention: General anesthesia and high-speed scan sequences help minimize motion and ensure clear, diagnostic-quality images.
Metallic Artifacts: Black Holes
Caused by metal implants, microchips, or collars.
Prevention: Remove all metal objects beforehand and adjust imaging settings when needed.
Ghosting Artifacts: Double Vision
Caused by breathing or heartbeat movement affecting the image.
Prevention: Adjust scan settings or use breath-hold techniques in anesthetized patients.
Knowing what to look for means you can flag potential issues before they impact the scan, ensuring the best results.
Your Role as a Vet Tech in Musculoskeletal MRI

An SVI employee provides expert care, ensuring patient comfort during musculoskeletal MRI scans.
You might not be the one interpreting the scan, but your role in MRI is crucial in making sure veterinarians get the best images possible.
Here’s where you can make an impact:
Monitoring anesthesia and patient comfort, ensuring the pet remains still, safe, and stress-free.
Perfecting positioning. aligning joints and limbs for accurate imaging.
Identifying artifacts, spotting distortions, and helping correct them.
Assisting the veterinarian by adjusting imaging sequences based on the case.
The bottom line: Every great MRI scan starts with a skilled, knowledgeable vet tech behind the scenes.
Build Your Confidence in Musculoskeletal MRI
Learning MSK MRI takes time, but every scan you assist with builds your confidence and skills. As you refine positioning techniques, sequence selection, and artifact prevention, you’ll become an invaluable part of the imaging team—helping veterinarians uncover what X-rays can’t.
Want to keep learning? Follow along in our MSK MRI Blog Series:
Part 1: How We Uncover Hidden Joint Pain with Veterinary MRI – A deep dive into the technology behind MSK MRI and why it’s a game-changer in veterinary medicine.
Part 3: 3T MRI in Action: Case Studies Every Pet Owner Should Know – Key scenarios where MRI provides crucial insights that other imaging methods can’t.